
March 5-10th, 2012 in Dubai! The schedule is out and it is going to be a great one! I'm very excited to be teaching once again at Gulf Photo Plus. This will be my 3rd year teaching and I'm looking forward to visiting with friends and teaching a few new courses.
I'll be teaching 2 of my Small Strobe Big Results workshops and two new course. One called "Corporate Photography & How to Build a Successful Business" and the other SSBR "The Next Step"
The instructors this year include David Hobby, Steve Simon, Bobbi Lane, Chris Hurtt, Joe McNally, David Nightingale, Martin Prihoda, Claire Rosen, Zack Arias, David Burnett, Greg Heisler and me.
For a complete run down of the workshops offered this year Click HERE
Preparing For An Up Coming Assignment
I have an interesting assignment coming up which has taken quite a bit of preparation. I'm headed to Ghana to shoot some mining for a long time client of mine. I have photographer throughout South America, Southeast Asia and the United State for more than 13 years for them.
This will be the first time shooting in the country of Ghana, I'm looking forward to the experience. My Visa has been finalized and I've had all my immunizations. Yellow fever shots, Tetanus, Diphtheria, Polio, Meningococcal and I've started my 4 doses for the prevention of Typhoid fever.
I have a large list of photos to take, it will take at least a full week to complete the assignment. I have to pack my gear carefully, I'll need some lighting and a few modifiers, stands and various grip equipment. I'll be traveling with my camera roller (Think Tank International), a personal bag and another roller carrying stands, modifiers and grip gear.
I'll give you the full details on the gear and the trip a bit later. I did a recent shot in the studio and I thought I's share that with you here. Normally, I shoot studio still life using my old studio strobes. The provide a modeling light and it is much easier to see your lighting position at any given time. I wanted a bit of a challenge and decided to use my SB-800's with just LumiQuest modifiers. Here is what I did. Let me tell you about the photo above. As many of you might remember, my father passed away about 3 years ago. I was left with his childhood stamp collection, stamps from around the world dating back to the 1850's. In going through his collection I found the follow item.
One of the albums was actually my Grandfather's, he was the president of Bolivia in the early 1940's. The album contained a letter that traveled on the Graf Zeppelin from South America to Los Angeles. I thought it would make for a wonderful photo.
Here is the set-up. I used a total of 3 Speedlights, 2 with LumiQuest Snoots and 1 fitted with the Softbox LTP. The Softbox over the set was used for a fill light and the Snooted Speedlights as the main and detail light. Here's a photo of the set. You can certainly do a lot with a small amount of lights! By the way, I'll be teaching at Gulf Photo Plus in Dubai again this year. The GPP will be held March 5 - 10, 2012. I'll be teaching (2) SSBR lighting workshops and a new 3 day workshop called Corporate Photography and How to Build a Successful Business. I'd be re-missed if I did not mention that I still have space in my Feb. 25, 2012 SSBR workshop here in Denver. If you would like more information about that workshop you can learn more HERE
Guitars at Long Island Photo Workshops
 Back in August of 2011, I was teaching at the Long Island Photo Workshops. This is one of the many photos I took as demonstrations during the week. This was a three light setup with an additional bounce.
Let's take a look at the setup below to see how this shot was created. As I mentioned, I used a total of 3 Speedlights for this photograph. The main or key was placed on a boom and the modifier is a Lumiquest Softbox LTp. I had my assistant Benny hold a 42" reflector to bounce additional light under the brim of the musicians hat. The other two Speedlights were wrapped with cinefoil or black wrap. The rear light was fitted with a full CTO and directed on the garage door just above the shoulder. This light not only adds some color to the image, but also acts as a separation light. The other Speedlight was directed to the tattoo on the arm.
Here is another photo from that same session. Two Speedlights used here for this shot. On the left (Key Light) a straight hard light with no gel on the flash. I get a blue cast from this light because my white balance is set to Tungsten or Incandescent. On the right, another Speedlight place on the ground with a double CTO on the flash. A very cool shot with such little gear. Here is the setup shot for you to review.
By the way, if you would like to see a complete list of light gear it use you can see my public wish list at B&H HERE.
New SSBR Web Site

I'm excited to announce that I have redesigned my Small Strobes, Big Results web site. Actually, my wife Debbie is the one who did this for me.
You will also see that I am now selling my popular SSBR Umbrella Adapter Flash Mount on the site. For those of you that already own softboxes and are looking for a convenient way of mounting your flash, this will help.
Like a lot of you, I own several soft boxes and speed rings which fit my larger studio lights. I wanted to be able to use my existing boxes and speed rings with my small flashes without buying a new dedicated speedlight softbox. I use to use a Justin Clamp to mount my flash on my speed ring, this method added weight and was a bit clumsy.
The SSBR Umbrella Adapter Flash Mount is constructed of high grade extruded aluminum that has been anodized flat black and fitted with a high quality cold shoe. Mounting my speed ring on the top of my umbrella adapter allows me the ability to pitch my soft box for more controlled lighting. I find that this product works for about 99% of all flash and speedlight combinations. If you find your flash is too tall to fit into the center of the speed ring, you may need to pick up a taller stud to accommodate a proper alignment for your flash. Shown below are both the extended reversible stud height and the standard stud height. Like I said, I find the standard stud height that comes most umbrella adapters work 99% of the time.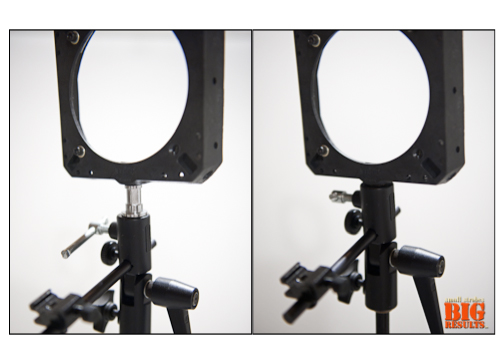
I have also added 4 SSBR workshops on the calendar for 2012 here in Denver, If you would like to have a workshop in your area, feel free to contact me for more details.
Which Direction Should I Light From?

Paying attention to the existing light will give you your first clue. Lets take a look at the following photograph and I'll explain my process and choices for doing what I did. I have photographed in this same location several times, this time I remembered to shoot a set up to share with you.
When I look at the scene before me, I see a long bank of window which I can use as a out of focus as a design element as my backdrop. With the windows on the right side of the frame, it makes sense to me that I should light from the same direction. Doing so allows for a more natural looking light, basically duplicating the lighting pattern that exists.
Lighting choice are many here, I could place my subject in the hard light of an open window if that were the type of light I wanted. I could perhaps place a silk over the window and use the sun as my light source, the silk would act as a large softbox producing a soft quality light.
Space permitting, I could assemble a large softbox or just bounce my light. The day I was photographing, this company was having their board of directors meeting. There was a lot of traffic around the executive floor and the choice of a softbox would just impede movement through this narrow hallway. Bounce was the right choice, and as you can see, look quite natural.
In the photo below you can see the actual setup, I aimed the flash high on the wall about the same height I would have placed another modifier. Special notice should be taken when looking at this photograph. I have a flag or gobo on the far side of the flash, this prevents the light from the flash directly hitting the subject. I want all the light reaching my subject from the bounced subject. I bounced my light on a section of wall between two windows.
On this particular day, I had 3 additional lighting setups on the executive floor. You can see a small card taped to my flash reminding of the setting for this particular shot. I can walk over to the set, look at my note and set my camera to the proper setting.
The card actually serves two purposes, a note to keep me straight and it serves as a small flag preventing flare in my lens.
If you are interested in learning more about the world of corporate and annual report photography I have some great news. This summer, August 5-10th, 2012 I'll be teaching a workshop at the Santa Fe Photographic Workshops titled "Corporate Photography & The Annual Report". If you think you might be interested, contact the workshops at Santa Fe to secure a spot.
Nikon Video Shoot (Part 1)
I've got to be one of the luckiest persons on earth! Way back in June, I received a wonderful email from Nikon asking me if I would be interested in being involved with a project. I had was thrilled to have received that email, the project entailed me being video taped shooting 3 different scenarios for the Learn & Explore online training at Nikon USA website.
My first contact with Nikon came back about 14 years ago. I was in NY visiting clients and decided to make an appointment to show my work to Nikon. From that meeting 14 years ago, I've had minimal contact with Nikon. I was once featured on their website with a article about my work. Two years ago, I took part in a video interview with fellow photographer Steve Vaccariello while visiting Photo Plus in NY.
This project involved 3 separate photographic techniques; bounce, day for night and artificial sunlight.
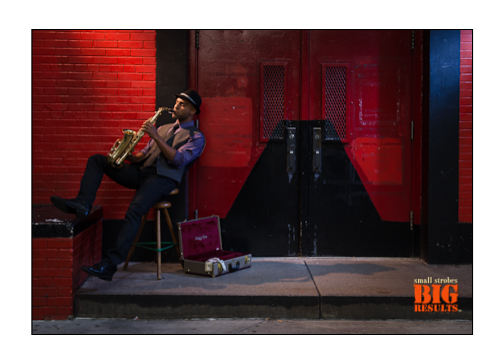
The first photograph I'll discuss here will be the Saxophone player. This photo was taken on a street corner in NY in the middle of the afternoon in open shade. I was given several choices of doorways to select from, the production team of John Sepe was absolutely super. I selected these doors because of the color and the fact that they would be in open shade at 1:30 PM. I knew this because I use a software program (TPE) which tracks the sun movement.

In this first photo you can see the ambient exposure, this was what the camera metering thought was a correct exposure. As I tell my student when I teach, your camera is only a light meter, the exposure meter is between your ears. When I look at the indicated "correct" exposure the camera gives, I think to myself... this doesn't look like night.
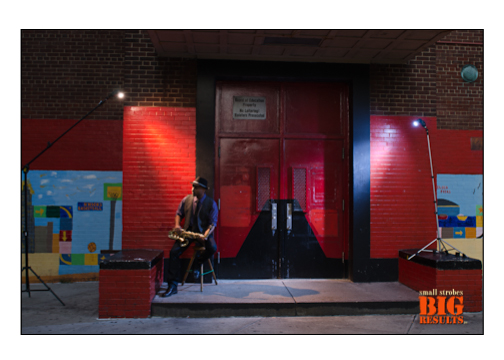
I than drive down the exposure using both shutter speed and aperture to what I would consider an under exposed image looking more like night. I'm not moving my shutter speed above my native sync speed of 1/250 of a second, because I want full efficiency from my speedlights. If I move into high speed sync, I loose a tremendous amount of power from the speedlights.
Needless to say, I'm delighted to appear on Nikon's radar screen once again. This was a substantial project for me, one with high visibility for me and I hope it leads to more projects with them down the road.